Two jobs, and nothing else
Drag & Print can do two things. You can keep both switched on, or just one. It does nothing else, and that is its strength: there is nothing to learn.
The program speaks English, and so do the pictures in this guide. It also speaks Italian, Spanish, French, Mandarin Chinese, Hindi and Arabic: you pick the language from the flag button at the top right of the settings window.
One thing is still Italian, and only one: the entry inside the Windows right-click menu. It comes from a separate piece that plugs into Windows itself, and that piece has not been translated yet. Its four possible wordings are listed further down, with what each one means.
First job: turning things into PDF
It takes an e-mail, a Word document, an Excel sheet or a picture and makes a PDF out of it — the format that opens the same way on any computer and that nobody can change by accident.
With e-mails the PDF keeps the look of the original message: colours, bold text, tables, the company logo. It does not turn into a bare sheet of text.
Second job: renaming with the date
It puts the date in front of the file name, written in one precise shape: year.month.day, two digits each.
Why the year comes first: Windows sorts files alphabetically, so this puts them in date order all by itself. Without you doing anything.
When you convert to PDF, the original stays where it is: a new file appears next to it. You lose nothing.
When instead you use renaming on its own (without conversion), the file is renamed: the old name is gone, because it is the very same file.
Three ways to hand it a file
They do exactly the same thing. Only your starting point changes. The first is the one you will use 90% of the time.
Way A — Right-click on the file
It is the handiest one, and it does not ask you to open anything.
Find the file in the folder where it lives.
Press the right mouse button on it.
In the menu that appears, click Converti in PDF e rinomina — Italian for “convert to PDF and rename”.
Wait a couple of seconds. The new file appears in the same folder.
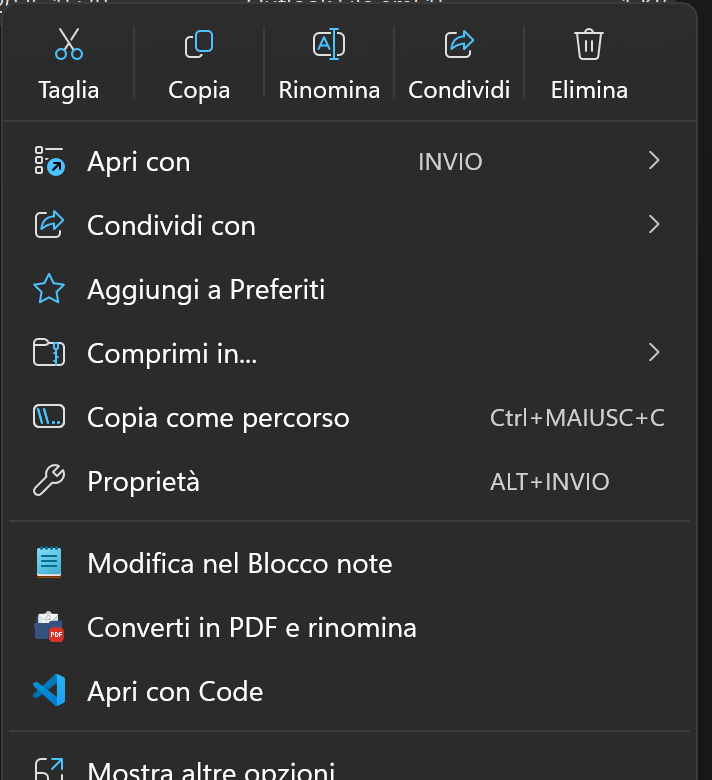
It does not only tell you that it is there: it tells you what it is about to do, based on how you left the settings.
- Converti in PDF e rinomina — “convert to PDF and rename”: both jobs are on
- Converti in PDF — “convert to PDF”: only conversion is on
- Rinomina con la data — “rename with the date”: only renaming is on
- Apri impostazioni — “open settings”: both are off, so there would be nothing to do to the file; clicking this entry opens the settings instead
If you read an entry other than the one you expected, do not touch anything: go to the settings and fix it there.
You can also select several files at once (click the first, hold Ctrl and click the others) and right-click once: it handles them one after another.
Way B — Drag the file onto the program icon
Pick the file up with the mouse and drop it on the Drag & Print icon, the one on the Desktop. The result is the same as the right-click: the new file appears in the folder where the original lives.
It works with several files at once too: select them all, pick up any one of them with the mouse and drag the group onto the icon.
When the files are already on the Desktop, or when you have a lot of them to do in one go and opening the right-click menu every time gets tiresome.
Way C — The Drop Zone window
It covers one precise case that the right-click cannot: dragging an e-mail straight out of Outlook, without saving it to the computer first.
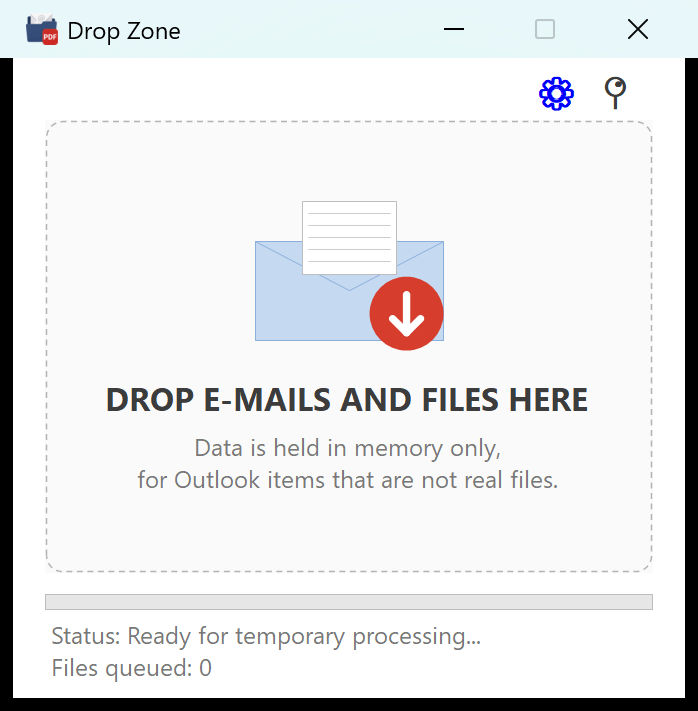
Open the Drop Zone (see chapter 03 for switching it on the first time).
In Outlook, click the e-mail in the list and hold it down with the mouse.
Drag it over the dashed box and let go of the button.
The line at the bottom says what is happening: Processing 1 files… and then Done.
An e-mail dragged out of Outlook does not exist on the computer yet: the PDF is saved into the save folder you choose in the settings.
A file dragged from the Desktop or from a folder already exists: the PDF is born next to the original, not in the save folder.
From the moment you sign in to Windows, the program keeps the slowest part to start already loaded in memory. That is why a conversion takes less than half a second instead of a second and a half. You do not have to do anything: it happens by itself.
The only thing that stops it is the Quit entry in the menu next to the clock, and it starts again on its own at your next sign-in.
The settings window, box by box
It opens in four ways: double-click on the program icon, left-click on the icon next to the clock, right-click on that same icon → Open settings, or the red cog inside the Drop Zone.
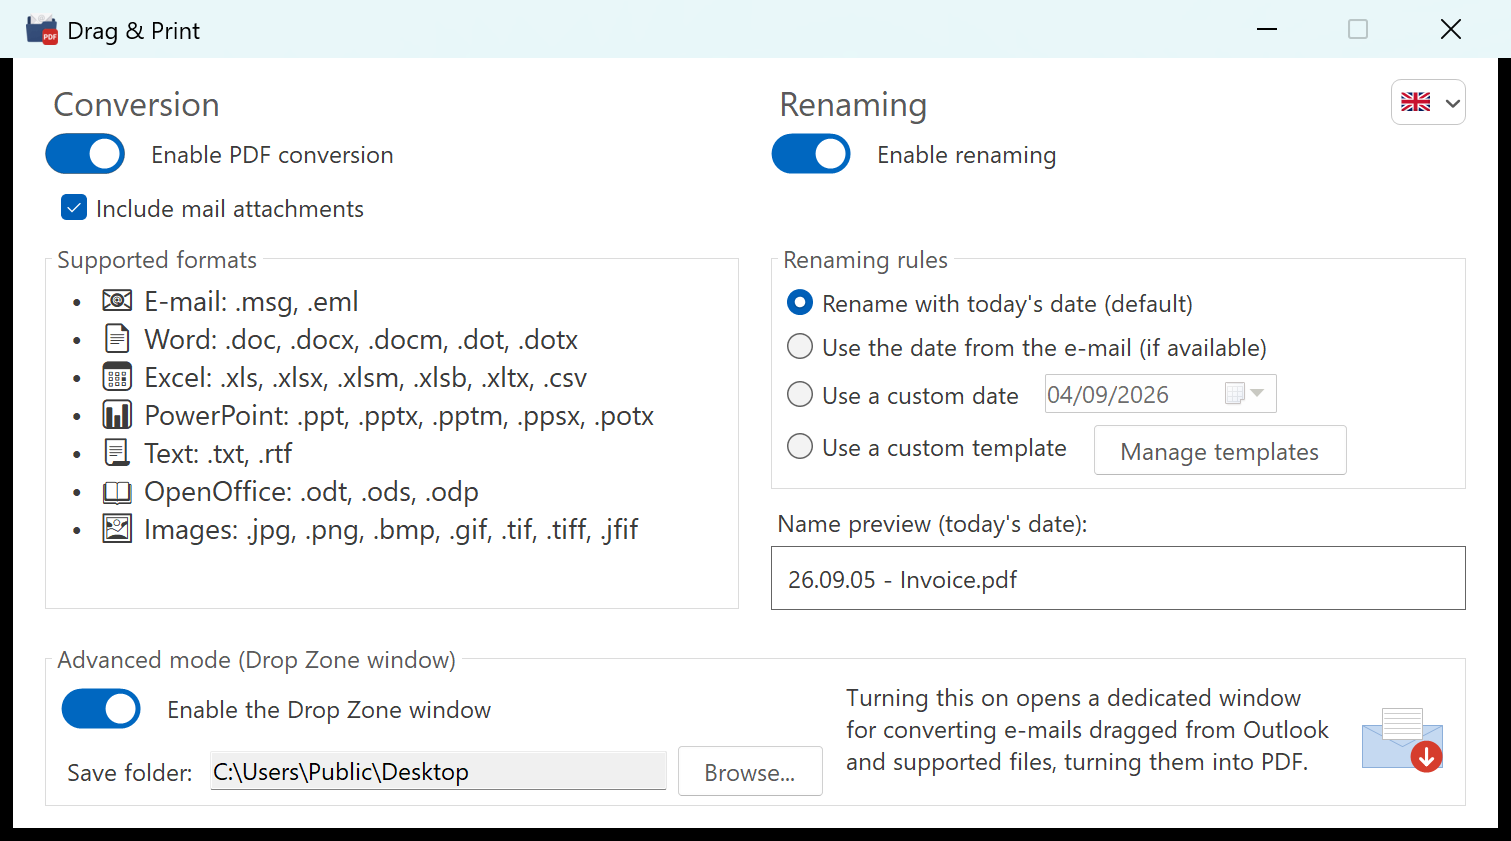
Every change counts straight away: the moment you move a switch or tick a box, the choice is already recorded. There are no Save or Cancel buttons — when you are done, close the window with the X.
If you change your mind, put the control back the way it was: that counts straight away too.
If you start the program while it is already running, a second one does not appear: the window you already had comes back to the front, reopened even if you had minimised it.
For the same reason the icon next to the clock stays one, however many times you click the program.
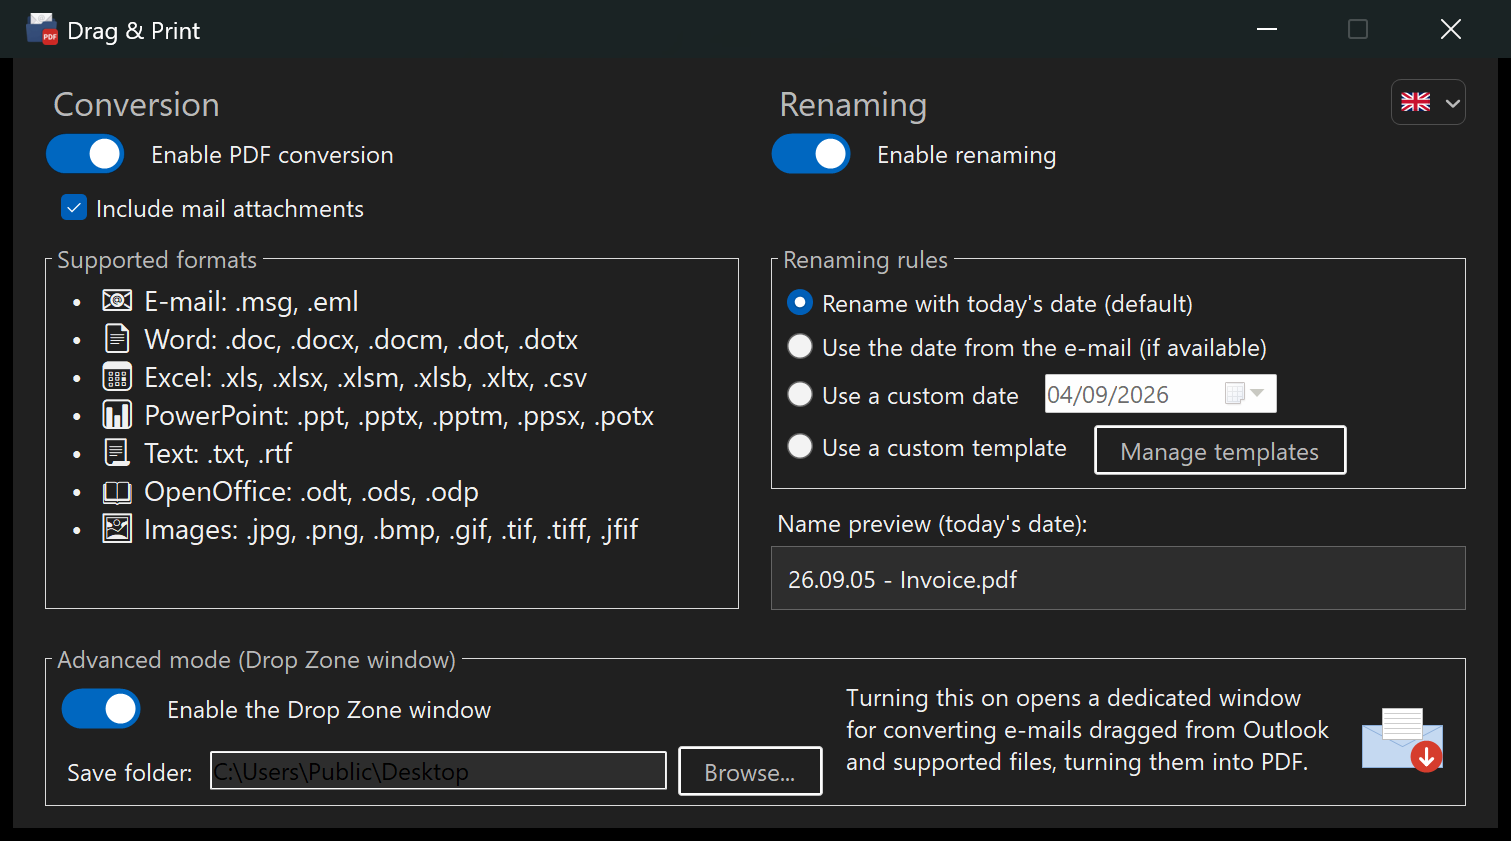
Box 1 — Conversion
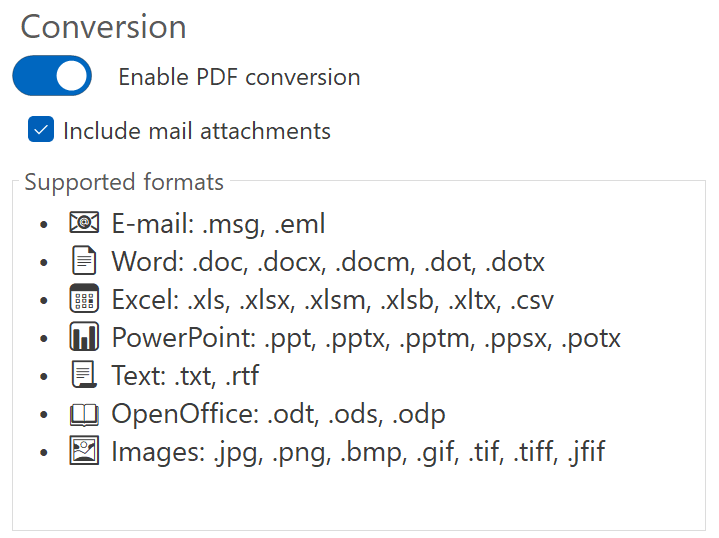
Enable PDF conversion
On: files become PDFs. Off: they do not, and only renaming stays active.
Include mail attachments
This one is only about e-mails. With the tick, the message’s attachments (the Word file, the Excel sheet, the photo) are converted as well and appended to the same PDF: you get a single document with everything inside.
Without the tick you only get the body of the message. If you often need the attached contracts together with the mail that carried them, keep the tick. Otherwise take it off: the PDFs stay far lighter.
Supported formats
This is the list of what it can convert: more than thirty kinds of file, written inside the box so you do not have to remember them.
| Family | Extensions |
|---|---|
| .msg .eml | |
| Word | .doc .docx .docm .dot .dotx |
| Excel | .xls .xlsx .xlsm .xlsb .xltx .csv |
| PowerPoint | .ppt .pptx .pptm .ppsx .potx |
| Text | .txt .rtf |
| OpenOffice | .odt .ods .odp |
| Images | .jpg .jpeg .png .bmp .gif .tif .tiff .jfif |
Inside each family the less common formats are there too: Word templates (.dot, .dotx), Excel workbooks with macros (.xlsm) or in binary form (.xlsb), slide shows that start on their own (.ppsx). Hand it a file outside this list and it warns you with a message and touches nothing.
Box 2 — Renaming
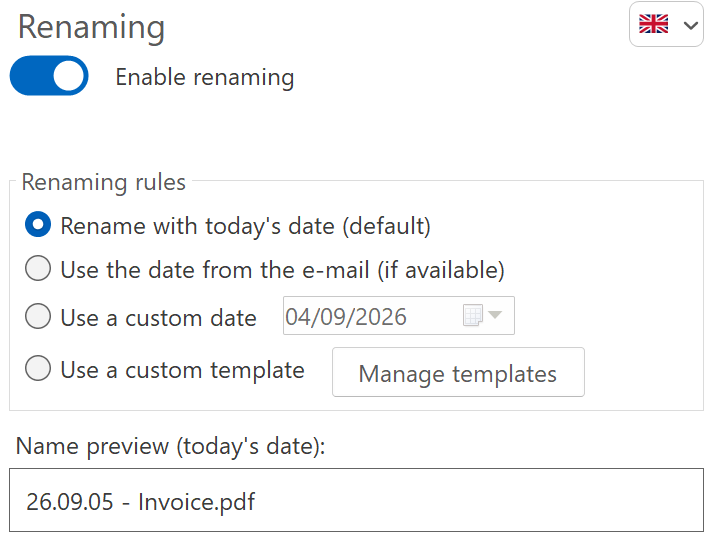
Rename with today’s date
The normal choice. It uses today’s date, the computer’s. If you file today’s post today, this one is just right.
Use the date from the e-mail
It uses the date the e-mail was actually sent, not today’s. If you are filing March’s correspondence right now, this is the right choice: the file will carry 25.03.12 and not today’s date.
It only applies to e-mails. A Word file or a picture has no send date, so for those it falls back to today’s.
Use a custom date
A fixed date you pick from the calendar. It is for batch work: if you have to file a whole case from one particular day, you set it once and it holds for every file in that session.
The custom date stays set tomorrow and the day after too. When the batch is finished, go back to Rename with today's date, or new files will keep being born with the old date.
Use a custom template
The fourth choice puts no date at all: it puts the text you want, before and after the file name. That is what the next section is about.
Name preview
The grey line at the bottom shows the result: 26.08.31 - Fattura.pdf. It changes by itself as you choose. If what you read there does not convince you, do not save.
The title of that line also tells you which rule the name comes from: Name preview (template in use) or Name preview (no template in use).
Templates: your own prefix instead of the date
The date in front of the name is right nearly always, but not always. If you file by job, by client or by year, what you need in front of the name is not the day: it is a word of yours. Templates are for that.
A template is made of two pieces, and it may have only one of them:
- Prefix — the text that lands before the name
- Suffix — the text that lands after the name, but always before the dot and the extension
The original name stays in the middle, untouched. The template only adds to the two sides.
Templates are written in the Renaming template manager window, which opens with the Manage templates button inside the renaming box.
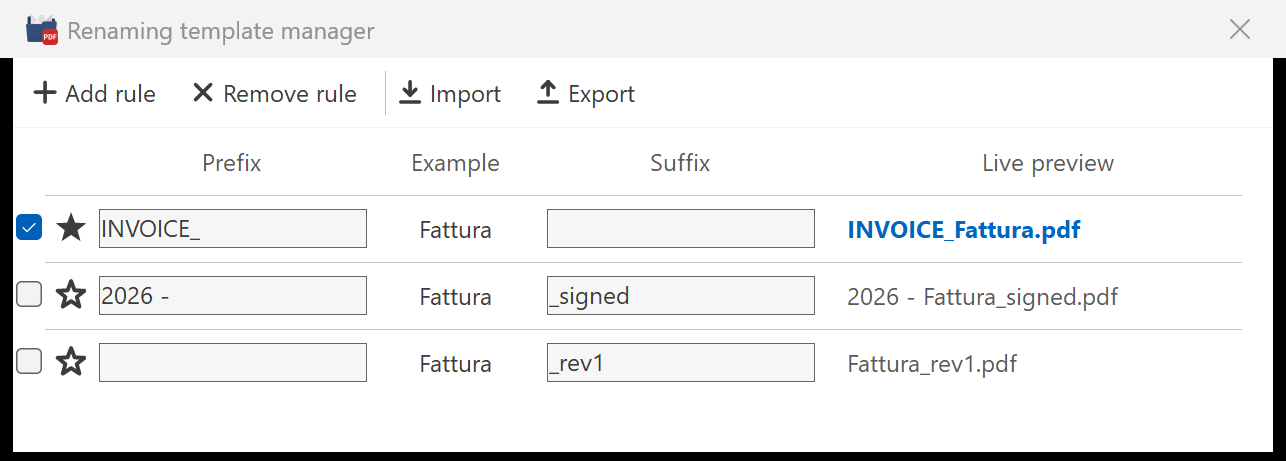
| Column | What it does |
|---|---|
| The tick box | Says which template is in use. There is only one at a time: tick another, and the previous tick clears itself. |
| The star | Marks the favourite template. There is only one star, and it is for one precise thing: that template can be switched on and off from the menu next to the clock, without opening anything. |
| Prefix | The text to put in front. Write it exactly as it is, spaces and dashes included. |
| Example | The starting name the preview is worked out from. It is only an example: it does not touch your files. |
| Suffix | The text to put at the end, before the extension. |
| Live preview | The finished name. It changes as you type, letter by letter. |
There are four buttons at the top:
- Add rule — a new, empty row
- Remove rule — takes the selected row away
- Import — loads templates from a file
- Export — saves them to a file
Export gives you a single file with every template inside. Carry it to the other computer, press Import there, and you find the same rules waiting.
It is how you get a whole office to write names the same way, without dictating them out loud.
If in the renaming box you picked Use a custom template but no row in the manager has a tick, the file is not renamed: it keeps the name it has.
It does not quietly fall back to today’s date, and rightly so: giving you a date you never asked for would be worse than leaving the name alone. If the name does not change, look at the ticks in the manager.
Box 3 — Advanced mode (Drop Zone)

Enable the Drop Zone window
Switches on the window you drag Outlook e-mails into. With it off, a double-click on the program icon opens the settings; with it on, it opens the Drop Zone.
Save folder
Where the PDFs of e-mails dragged from Outlook end up. Press Browse… and pick the folder you normally file into. If you pick nothing, it uses the Desktop, so at least the files are in plain sight and do not vanish.
If one day you move or delete that folder, the program does not seize up and does not lose the files: it goes back to the Desktop on its own.
The quick menu, next to the clock
The program keeps a small icon at the bottom right, next to the clock. Right-click on that icon and a menu appears that does six things, without opening any window at all. Left-click, and the settings open straight away.
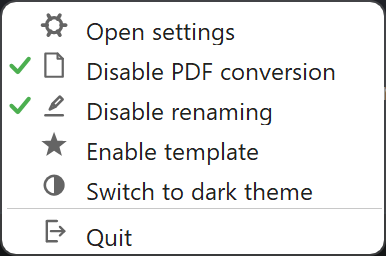
| Entry | What it does |
|---|---|
| Open settings | Opens the window with the three boxes described above. If it is already open, it brings it back to the front. |
| Disable PDF conversion | Switches conversion off. Next time the entry will say “Abilita” (enable) and the tick will be gone. |
| Disable renaming | Switches renaming off, the same way. |
| Enable template | Switches the starred template on and off — the one marked as favourite in the manager. This entry only appears if a star exists: without one, it would have nothing to switch on. |
| Switch to dark theme | Changes how the program looks. It applies both to this menu and to the settings window. |
| Quit | Closes the program completely, including the part that works quietly in the background. |
The green tick says how things are right now. The wording says what happens if you click it.
So “Disable PDF conversion” with a tick means: conversion is on, and clicking switches it off. Without a tick you would read “Enable”.
Switching the template off means not renaming. The program does not move you to today’s date on your behalf, and in the settings the dot stays where it was: so when you switch it back on, you find the choice you had made.
If you need the date while the template is off, go into the settings and pick Rename with today's date.
If you cannot see the icon, click the little upward arrow to the left of the clock: Windows hides the seldom-used icons in there. You can drag it out once and for all by holding it down with the mouse.
Light or dark
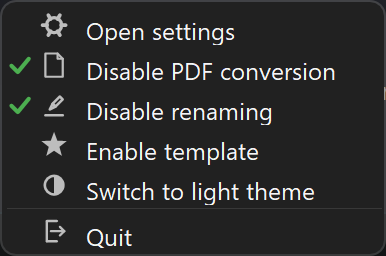
The Switch to dark theme entry changes how the program looks. The choice survives switching the computer off, and it applies to the menu and to the settings window together.
It does not only close the icon: it also stops the part of the program that stays in memory to keep conversions quick.
After “Quit” the program still works — right-click and Drop Zone do their job as always — but every conversion goes back to taking more than a second instead of half of one, because it has to start from scratch each time.
Everything goes back to normal at your next Windows sign-in, without you doing a thing.
In two files inside your own user folder, under %APPDATA%\DrangAndPrint: impostazioni.json for the three boxes and modelli.json for the templates.
If you had already used an earlier version, your choices were picked up automatically at the first start: there is nothing to redo.
What the PDF you get looks like
The PDF of an e-mail opens with a header block, then the message as you saw it in Outlook.
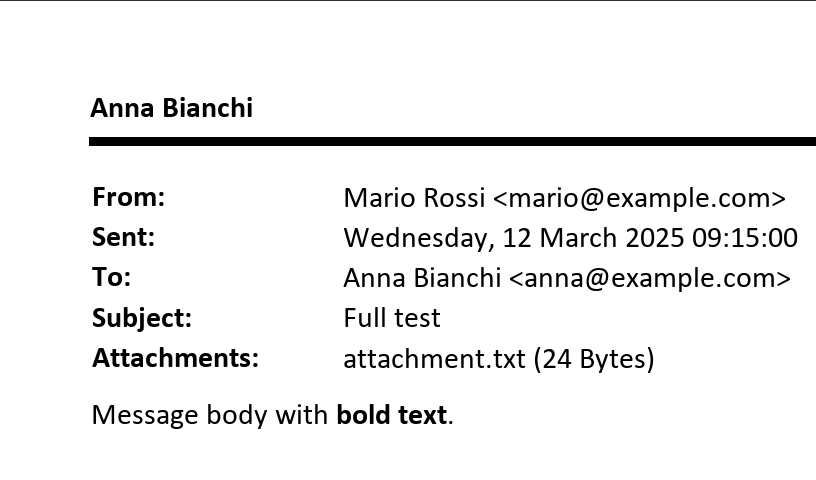
| Line | What it holds |
|---|---|
| Name at the top | Who created the PDF, taken from the account you signed in to the computer with. |
| From | Who wrote the message. |
| Sent | The real date and time it was sent, written out in full. |
| To | The recipients. |
| Subject | The subject of the message. |
| Attachments | The name and size of every attachment. It only appears if there are any. |
At the foot of every page you find the page number, centred. If you had switched on Include mail attachments, the attachment pages carry on after the message, one behind the other.